x marks the spot
Magnetic Corner Bookmark
a tutorial
Gather your supplies:
Embroidery floss, scrap cardboard (a used cereal box is ideal), calico, scissors, craft knife, needle, fade out marker, adhesive backed magnetic tape.
Step 1:
Take a deep breath…there’s a bit of maths here.
Prepare your templates.
Cut a 13cm (5.1 inches) square from scrap cardboard
Cut a right angle triangle measuring: 7.5cm (2.95 inches) x 7.5cm (2.95 inches) with a hypotenuse of 10.5cm (4.13 inches).
Step 2:
Cut your magnetic tape to fit & stick it to the triangles so that they come together neatly. Set aside for later.
Step 3:
Using your square template as a guide cut out your calico. Leave a seam allowance outside the template of approximately 1.5 cm (3/4 inch).
Step 4:
Press your calico square around your cardboard template.

Begin by pressing the corners as pictured above.

Next press each of the sides as pictured. This removes a lot of the bulk in the corners & will keep the folds nice & neat.
Step 5:
Remove the cardboard template & fold the square in half to form a triangle.

Press. Fold in half again & press.
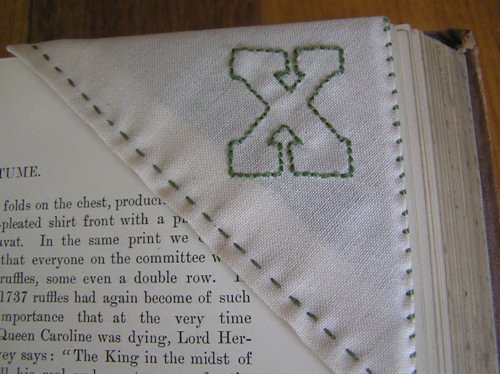
Step 6:

Print this template or just trace/draw your own "x".

Unfold your pressed triangle & positioned it right side up. Whip out your fade out marker, check your folds carefully & mark your “x” where you would like it positioned on the face of the book mark. You need to make sure that you mark your “x” in the left hand (or 9 o’clock) triangle of your square. Just bear in mind that the centre seam will run parallel to the spine of the book.
Step 7:
Stitch your “x”. Gift…use a speedy stitch like running or back stitch.
Step 8:

Once you’ve finished stitching your design place your work face down on the ironing board & repress the folds.
Step 9:

Position your triangle shapes (magnet side down) inside the seams & fold in half.
Step 10:

Pin to secure.
Step 11:

Running stitch along each of the short sides of your triangle.
Step 12:

Once you’ve completed the running stitch – make the final fold & remove your pin. Now blanket stitch the short side closed to form your “cuff”.
You’re finished & ready to gift.
...
Would you like the premium how to? There are lots more images, printable templates & some extra tips too. All for less that the price of a coffee & delivered to your inbox. CDs & kits also available - over here.