Sweet Fabric:
how to

  • How to: wrapped tealights...

    How to: wrapped tealights...

    The wedding on Saturday was a real group effort.

    Friends of the bride & groom shared their talents and helped out with cake decorating, invitations, photography & personalised chocolates as place settings!

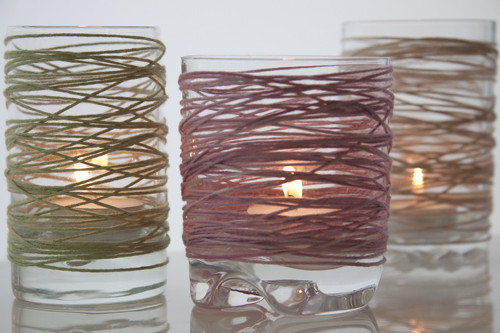
    I had a hand in the centrepieces for the tables. They looked beautiful and created a lovely romantic ambient glow. These are just perfect if you're planning a DIY wedding because they can be made well ahead of time.

    The glasses were picked up for 50 cents a piece at local op shops. We chose to wrap in bamboo which had a lovely sheen & looked very pretty in the daylight.

    wrapped tea lightView more presentations from kootoyoo.

    Obviously these can be used and reused for different events & as either tealights or vases.

    Perfect for your holiday table too.

  • How to make no sew decorations...

    How to make no sew decorations...
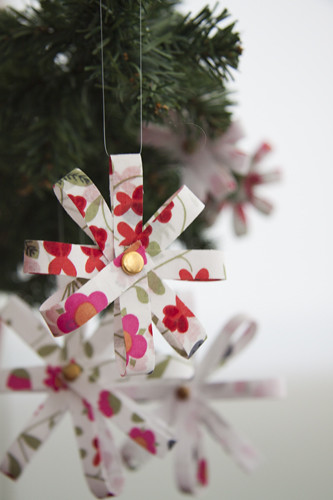
    Christmas stars or festive flowers ... totally up to you.

    The beauty of this speedy project is that the flowers can be enjoyed all year round. You could make a garland or use them to adorn gifts.

    Another 5 minute craft. I'm all about the speed at the moment. Maybe you've made something similar out of strips of card separated to make a bauble?

    no sew star flower decorations
    View more presentations from kootoyoo.

    Other decos I've seen around & loved...

    Meg's dove
    Blair's doily tree
    Maya's countdown

    Enjoy & have a great weekend.

  • How to make doily covered soaps...

    How to make doily covered soaps...

    It's totally faker crochet! If you are a purist...power to you. Hook yourself some little caps for soap.

    I confess I find the gifting of handmade items something of a challenge. It's one thing to give something you've painstakingly hooked, or stitched, or knitted, or sewn to someone else who makes things & appreciates them. It's quite another to gift the same items to folk who've no idea of the time involved. Faker or not - it's all the same to them. So...at this time of year when you're crafting to give I heartily recommend the faker route.

    I got lucky at the oppy a couple of weeks ago & picked up a set of 6 crochet coasters which were a bit stained & yick. I slung them in the washing machine & stared at them for a while & wondered if a soap cosy might be just the ticket? Loofah & soap in one...yep! Time to have a crack folks.

    Five minutes flat per soap...maybe less.

    How to make faker crochet covered soap
    View more presentations from kootoyoo.

  • Hyperbolic without a maths brain...

    Hyperbolic without a maths brain...
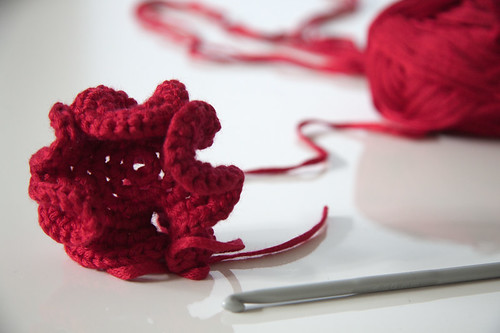
    WOW... lots & lots of you are pretty excited about hyperbolic crochet. Maybe you're keen to have a crack yourself? Good on you I say...

    Hyperbolic crochet is all about maths! You can find out all about the formula here.

    I do not have a maths brain. What I read was blah, blah, blah, blah CHAIN blah, blah blah, blah SINGLE (AU double) blah, blah, blah, blah.

    What I did...

    CH 2
    6DC (US single) into the 2nd chain from the hook.

    Then I just spiralled (out of control) 2DC (US single) into each DC (US single) repeat ...... for 2 balls of yarn. It's probably not mathematically correct but it gave the desired result. My finished hot pink number fits into my cupped hands.

    Further very valuable info...

    Last night I was lucky enough to attend the launch of Sew La Tea Do by Pip Lincolne. The event was fabulous, the book is fabulous & actually Pip is quite fabulous. I was thrilled to be included.

    I was further thrilled when Gemma Jones told me that The Melbourne Reef is being exhibited in Upwey! I'm so totally going along to see it. They are even hosting workshops.

  • How to faker crochet cushion...

    How to faker crochet cushion...
    crochet cushion

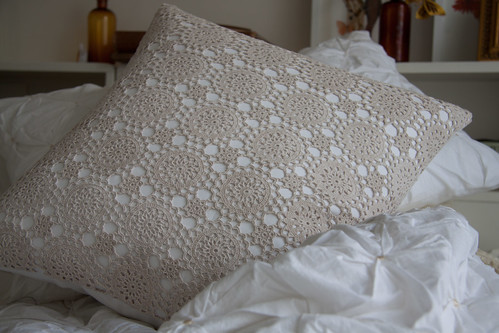
    A little while ago I picked up these beautiful crochet cushion cover/cosy pieces at the Op Shop for the princely sum of $2 a piece!

    They are stunning & the work that has gone into making them...incredible. If you're all about the hook & proving your eye straining worth then go for it I say. You'll earn my respect.

    more pretty girly stuff

    BUT I'm all about the smoke & mirrors & figured I'd have a go at a bit of fakery based on the original.

    I love the combination of natural & white. I've used a thrifted/opped table cloth & a hotel grade (also opped) sheet. The sheet further adds to the fakeness of the whole deal as I didn't even have to hem the envelope closure.

    I ripped the sheeting to size & whipped a pair of these up in under 20 minutes. I figured this bit of magic might be something you guys would like to have a crack at. I think that they would make excellent Christmas gifts.

    The Date hates the pretty girly lights, hates the TV cabinet & chair but surprisingly doesn't mind the cushions! He still thinks the room's too girly but I'm not convinced. I prefer fresh.
    Faker crochet cushion
    View more presentations from kootoyoo.

  • How to make the contortionist crochet cuff...
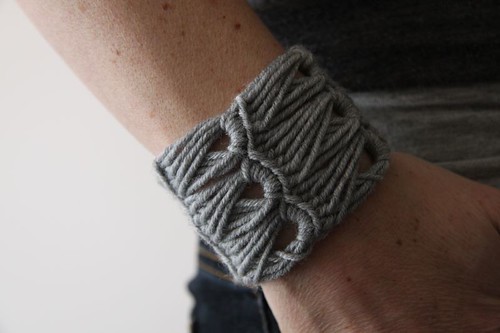
    How to make the contortionist crochet cuff...
    Broomstick Lace

    or buy one if you feel so inclined.

    I had no end of trouble with the making of my own video. There was much swearing & carry on I can tell you.

    It's three strikes & you're out around here. The Flip has been benched! So...I've ended up with a how to make up the cuff.

    There are a swag of videos on youtube demonstrating broomstick lace & you can check those out right here.

    How to make a contortionist cuff
    View more presentations from kootoyoo.

    I've had a number of "can I buy" requests. Historically, the making for money thing hasn't been kind to me...it's taken the joy away.

    BUT the requests got me thinking & then I came up with the "more than one & less than a few" idea. I was so enormously chuffed with myself that I decided to actually make a couple for sale.

    The Sometimes Shop will be stocked for one week only & then they go to the present cupboard (more affectionately termed the craft-skeleton-hiding-cupboard). Free Postage within Australia.

  • How to make pretty lights...

    How to make pretty lights...
    Light Group

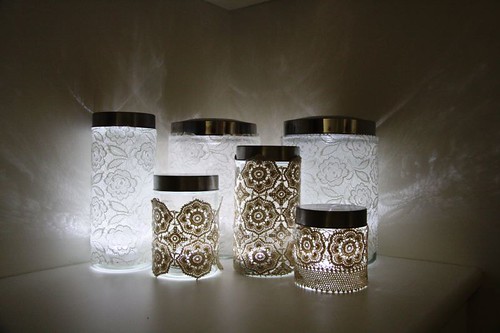
    Ambient light in 5 minutes flat!

    The jar lights I made created quite a bit of interest.

    The benefit of using LED lights over tealights is safety & if you're having an outdoor party you don't need to worry about weather as the light would of course be protected by the lid of the jar.

    Edit: I used large jars which were purchased very cheaply from a homewares store but used kitchen jars would work too. If you want uniformity with the the lids then perhaps a coat of paint?

    The LED battery operated lights that I used were purchased from Bunnings. They are OSRAM brand "Dot-it" lights. They are around the $10 mark but they do just go on & on & on. I've also seen them at lighting shops.

    I'm seriously considering setting up something in the garden similar to this brilliant piece of garden art...

    freshly installed
    & 3 months later

    which was inspired by Margie's project here.

    Of course, you don't really need a how to...it's a speed demon type project. Forge ahead, have a crack & you can't really go wrong.
    How to contain the light
    View more presentations from kootoyoo.

    & because I wanted to try out the embed feature through Google Docs...

    you just need to click the little icon in the top right (open in new window) if you want to print the pdf.

    If you liked this idea you might also like the wrapped tealights.

  • How to make a crochet & cross stitch beanie...
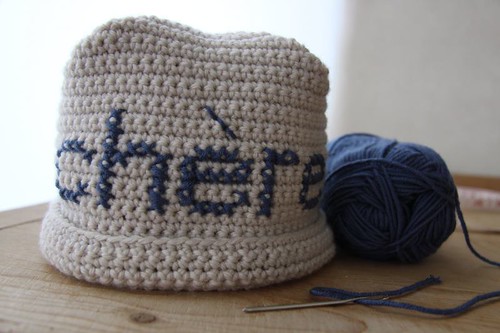
    How to make a crochet & cross stitch beanie...
    CrossChere

    for anyone...anytime.

    It doesn't rely on tension, hook size, type of yarn blah de blah.

    CrossChereKid

    You just need to worry about making sure the rectangle of fabric measures...

    circumference x head height = super cute 'x' stitch beanie

    Formula

    I was lucky enough to have recipients easily lassoed by the measuring tape but if you're making for a gift you might like to refer to this excellent size chart found via google this afternoon. Thanks Bev.

    How to make a crochet & cross stitch beanieView more presentations from kootoyoo.

    I knew the heart wasn't going to fly so The Big Girl & I went for something très sophistiqué. The kid hasn't taken the beanie off since it was gifted. Both The Little Guy & The Date think it's fabulous (& those fellas are a tough craft audience).

    There's a pdf here if that helps you out.

    It goes without saying that you don't have to be able to crochet to make this beanie. You could follow the same formula & use some lovely wool jersey & the machine. That'd make it super quick.

  • Smokey Sleeves Shrug...

    Smokey Sleeves Shrug...
    Treble Front

    I can't help it. The hook is superglued to my hand at the moment. The Date's getting heartily sick of taking pics of me so that'll be it for the grown up sized stuff for a while.

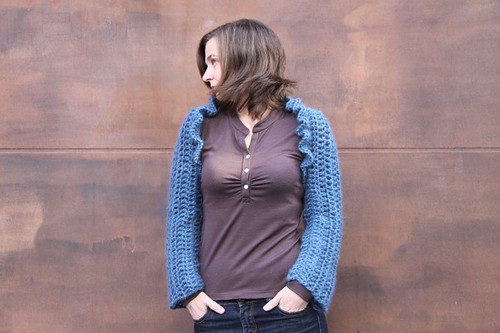
    This colour can only be described as Pigeon blue because everytime I see it I think of Christie.

    I'm still churning out the granny shrugs (not for me) but this deliciously warm, smokey, sleeves-only number is all mine.

    Foundation chain to completion in one day (I was at a gym competition). More realistically it's two nights in front of the teev.

    Treble Back

    Made up as I went along but based on the circled creation of last week which was based on a knitted Sunspun creation.

    If you'd like to hook yourself a speedie little number it's super easy...just a rectangle really. You could just dive in & have a crack but for those who like a "pattern" (& I use the term loosely), I have a pdf here.

  • How to make a granny shrug...

    How to make a granny shrug...
    Shrug

    You can do it too!
    Today is your day!

    How
    It seems that the mulberry granny shrug has inspired a few of you to have a crack yourself. That's super exciting & exactly why this patch of web space exists. Over the weekend Lara & I have worked together to present to you the whole box & dice for the granny shrug enthusiast.

    There's something for everyone. This is the master class...for lovely folk who like to follow a pattern, or maybe you need the visual (like me) or perhaps you'd like to watch a dinky video.

    If you know how to make a granny square then you know how to make this shrug. Just crochet yourself a couple of lovely granny hexagons.

    You can just skip over the "instructions" & make the granny exactly as you always do. Maybe you slip across to the next chain space...ripper knock yourself out. There is no "right" way to make it.

    You'll just end up with a lovely curly hexagon...good, that's great...exactly what we want. Just keep checking your sizing after each round to decide when you're done.

    Mine have been 9 rounds (in the Wilderness) but depending on your tension & hook size yours might be 8 or 10 or more. Keep folding the curly hex in on itself until you're confident that the fit will be right for you.

    the pattern
    My very favourite crocheter is Lara. She's one of the reasons I picked up the hook in the first place. She likes to be good at stuff & works hard to make sure she gets things right. Well, guess what? She's written a fabulous, fabulous pattern (it might not have posted yet...be patient) for you to print & keep. And spared you all from my effort at a written explanation. Thank you Lara, you're the very best & it was lovely to share the making of the how to with you.

    & the video
    Just so you know it was really hard to crochet standing up stradling a tripod & keeping (or trying) the crochet in the frame.

    Australian/UK terminology

    Yarn
    You've got a HUGE amount of flexibility here. You want to achieve a good deal of chunkiness & you'll just adjust your number of rounds accordingly so pick something that suits your style. I did make the suggestion the other day to use stash yarns crocheted together to make up the chunky style yourself.

    I used Patons "Wilderness" 14ply. I like it...A LOT. It's a blend so purists might like to check out other options but I think it's just the perfect yarn for the job. Here's why... (& where to buy too).

    OR you can have a go with 2 balls of 8 ply held together or whatever else takes your fancy. You'll just adjust your number of rounds according to tension & fit. Go nuts. Lara's using two strands of 12ply & is very happy with the result.

    Hook
    I'd say 15mm. I'm really happy with the result I'm getting with the 15mm hook. You need it to be loose so that you get a nice drape with the finished "fabric". We're not going for sturdy here folks...we want the pretty drape.

    Making Up
    I switched to a 2.65mm hook & just used double crochet up the centre back seam.

    Then I doubled along the top sleeve seams & single crocheted along the back of the neck opening to give extra strength.

    Again if you know how to do it your own way...do that. It will be great.

    What, haven't had enough? Here's the steak knife! A round by round for the visual learner.
    How to make a granny shrugView more presentations from kootoyoo.

    Other Stuff
    There's a flickr group. If you make a shrug we'd love to have it added to the group.

    HAC class? There have been a couple of requests for a HAC class for the shrug. If you still think you need it or would like to make it up with a bunch of other girls over tea & biscuits, I'd be happy to run it over two evenings. If you're keen please email me kootoyooATgmailDOTcom & if we get enough interest we'll go ahead.

  • Do you speak crochet?...

    Do you speak crochet?...
    Chunky Crochet Map

    I've just realised I missed a whole round of the .. in the centre of the double clusters. Blow.

    I found one of the hexagon jackets that inspired the granny shrug. I'd completely forgotten where I'd seen it most recently & it was (of course) Sarah London.

    I'm really pretty terrible at reading instructions & prefer to "read" the actual piece.

    But I've prepared a little "how I" rather than a how to.

    Yarn
    Caressa Express - it's one of those "super chunky fast knit yarns" which isn't a ply. As the gorgeous grey (& possibly the yarn) is discontinued I did a bit of experimenting yesterday to offer some alternatives.

    Chunky Crochet

    The top hex is the Caressa Express which actually works out kind of expensive as each ball is only about 50 metres long.

    The other grey one is a 14 ply which is about the same price per ball but has around 100 metres per ball.

    Finally, the blue is two balls of 8 ply crocheted together. This would probably work out around the same price as the 14 ply but what I like about this option is that your colour choice is massive.

    The Hook
    I used a 15mm hook. I am super tight though so you might want to try something a little smaller if you're an average or loose crochet queen.

    Begin
    It's just the same as crocheting a granny square (if you don't know how to to that you can learn from Pip or Sarah) except you're making your double clusters from the six points rather than four corners.

    I made my hexagons "reversible" which means that the work is turned after each round. There's no right or wrong side. I like it because it seems to keep my work nice & even. My squares are square when I use this method. When you're not changing colours each round it does seem more prone to wonk uncontrollably (for me anyway).

    Just keep adding rounds until it's the right size for you.

    Have a go! Pretty small time investment & it does look really cute over a long sleeved top.

    Granny Shrug Front
  • How to iron embroidery...

    How to iron embroidery...
    Pressed & Dressed

    I've mentioned before that I never use a hoop. Even though I'm really careful & I stretch & ease as I stitch my finished pieces are often a bit puckered. They never look it do they? I'll show you why! This might be the totally wrong thing to do but it works for me. If you're a traditionalist & you're tsking at me now...I'm sorry & don't read on.

    First of all you should know that I HATE ironing. I do not iron a single item of clothing. The iron is reserved strictly for crafty activity. When it comes to embroidery however, the iron is my very best friend.

    Secondly, I always transfer my designs (or freehand draw them) with a wash out marker. I'm not snobby or loyal about the brand. Whatever is on offer is fine for me. That means that every piece of stitching I do needs a little bath before I press it.

    IMG_8415

    Now prepare your ironing surface. You need a nice squishy towel. This will help absorb the moisture as well as protect your stitches.

    IMG_8417

    Next pull your embroidered piece out of it's bath & give it a gentle squeeze to remove excess moisture. Place it FACE DOWN on the towel.

    IMG_8418

    Now begin ironing the piece. Yes, while it's still wet. You are going to iron it dry. Use a dry setting on your iron & go slowly. Just waving the iron gently over the back of the work. Keep watching (& smelling) your work. Do NOT burn it. Once all the fabric is dry you might notice the stitches & fabric around the stitches is still a bit moist. That's OK, just leave it to dry lying flat.

    IMG_8420

    This piece was fairly simple & really didn't show any signs of puckering but was certainly covered in wash out marker. If you're working on a larger piece I would suggest ironing from the centre of the work out. Smooth & stretch your embroidered piece as you go.

  • Coke as a cleaning agent...

    Coke as a cleaning agent...
    Coke Works

    you bet!

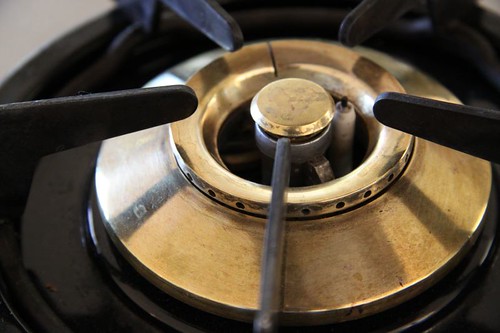
    These brass burners were pretty badly tarnished. They've come up wonderfully (& with very little elbow grease).

    I just gave them a light buff with steel wool after they had soaked in Coke for a few days. If you're going to have a crack at this...

    -Get an airtight container (to keep the bubbles bubbling longer).

    -Place your burners in the container & fill with Coke until they are well covered.

    -Regularly change the Coke over the next couple of days.

    -Buff with steel wool (not jex...the real stuff).

  • How to Stem Stitch (sort of)...

    How to Stem Stitch (sort of)...
    S

    It was so nice to have a bit of time to myself yesterday.

    I've had a few emails asking for pointers on stem stitch & again I think that this is the kind of thing best learned by watching & listening rather than still shots or sketches.

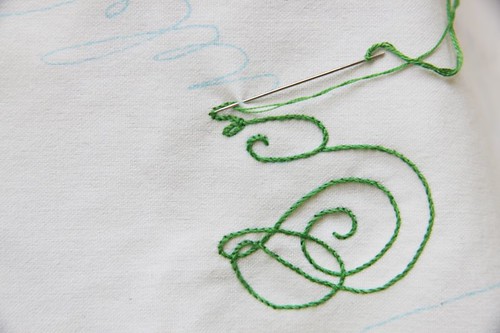
    I stitched a bit of lettering & thought that I'd share the video. I've kind of adapted my traditionally taught stem stitch over the years. Vick...if you're reading this - click away now. This is my "go to" stitch. I use it for lettering, for outlining & for anything with a curve. I love the flexible nature of this stitch. You can very easily rocket ahead on straight sections & then slow right down & do teeny tiny stitches around sharp turns. It's a forgiver...I like that.

    Hoping that this helps you out & you become a (sort of) stem stitcher too.

    Now that I watch this video...is it any wonder my stitches are so tight. Just look at how I "correct" each stitch.

  • How to embroider a French Knot...

    How to embroider a French Knot...
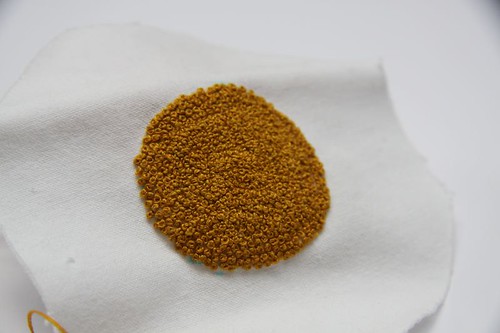
    French Egg

    I do love French Knots & I trot them out at every opportunity. Time consuming if you cluster them - yes. This lot represents about 4 hours of knotting!

    But I remember they were mystifying for such a long time. Maybe it was the quick movement of Vicky's hands...they always seemed beyond my reach. I always ended up in a French mess!

    I've had a few people ask about French Knots so I've prepared a little video of how I French Knot. For me the key/secret is the "correction" which you'll here about & see if you watch the video. I hope you find it useful. It's a great stitch to have in your "kit".

    I'm working on my video skills. Obviously I was holding the piece too close to the camera...ah well...practice, practice, practice.

    Video made using The Flip.
    Thanks to Flip Video, I love this piece of equipment.

  • How to make a laptop &/or cookbook stand...

    How to make a laptop &/or cookbook stand...
    Laptop Stand

    I've posted a little "how to" over at Feeling Stitchy today.

    I know embroidery takes some time & it isn't everyone's bag. If you're not into stitching this is pretty quick (just a bit of waiting around for glue to dry) project.

    I actually used an old pillowcase to make mine so you could do that too or use lovely new designer fabric or maybe even go wild with the fabric paint. Whatever takes your fancy.

    Book Stand

    I'll be spending the day (yet again) over at the old house. I'm trying to breathe some new life into the Castlemaine Slate on the front verandah. I wonder about that CLR stuff? I think I'll have a quick "chat" with Mr Google before I head off.

  • Crochet & timber...

    Crochet & timber...
    TV Unit

    We all know I'm a huge fan of just about anything "on wood" but I had no idea just how much I was going to love the crochet table cloth hacked & tacked to a couple of pieces of thrifted furniture.

    Things are coming together quite nicely in the new house. If you've had a peek inside my place you'd notice that there was only a tiny patch of our bedroom photographed. We've been looking for something nice & skinny for the TV to sit on. It's in an awkward place because it's very close to the ensuite door.

    I'd picked up this glass fronted cabinet at the Op Shop (for $5) intending for it to be hidden in The Date's office & reserved for his "straight to the pool room" golf trophies & such. It looked ridiculous & he pitched it out into the hallway earlier in the week. I seconded it for this maybe temporary maybe permanent fixture in the bedroom.

    I'm not a huge wrap for the basket shelves (which came out of this unit) I've fashioned below & prefer a more open look. I've got another idea for that (which will hopefully still hide the power cords). I'll keep you updated.

    While I had the glue gun out I worked a bit of crochet magic on this sweet chair (also Opped for the princely sum of $5).

    Crochet Chair

    Beautiful floaty images by Bricolagelife.

    So I think I've managed a pretty nice bedroom makeover for under $20! Unbeatable value & my very favourite ... reused, repurposed, recrafted, upcycled.

    If you fancy having a go at this yourself it's just super-easy-thrown-together fun.

    You'll need...
    double sided tape, spray adhesive, hot glue gun, a thrifted crochet table cloth ($2-$8).

    For the cabinet...
    Using double sided tape create a frame on the inside of the door (as close to the glass as possible).

    Then...
    Rough cut the table cloth to size. Keep all the motifs intact at this stage.

    Now...
    Expose the double sided tape & position your crochet piece.

    And...
    Use your hot glue gun to more permanently adhere the crochet piece.

    Finally...
    Trim away excess fabric so that everything looks nice & neat.

    Repeat for the other door.

    For the chair...
    Rough cut the table cloth to size. Keep all the motifs intact at this stage.

    Then...
    Spray the wrong side of the tablecloth piece with spray adhesive.

    Now...
    Position on the chair.

    And...
    Use your hot glue gun to more permanently adhere the crochet piece.

    Finally...
    Trim away excess fabric so that everything looks nice & neat.

  • How to make a wrist cuff - faux wood & embroidery...
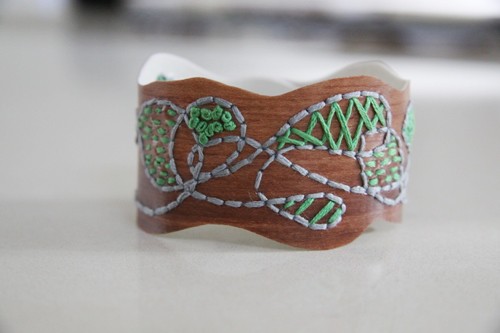
    How to make a wrist cuff - faux wood & embroidery...
    Wrist Cuff

    Here's the how to for my wrist cuff. This cuff makes an excellent gift & is a fairly quick & easy project.

    You should be able to pick up vinyl off cuts from your local hardware or flooring shop.

    Obviously you could stitch text or basic images using the same technique. Just be careful not to make your design too detailed...you'll drive yourself crazy.

    How To Make a Wrist Cuff - faux wood & embroidered.View more presentations from kootoyoo.

    - You can pick up the print friendly PDF tutorial here...
    how to make a wrist cuff

    I'm planning on doing more "how to" posts this year. I've made myself a rule ... but it's a bit early to say if I'll stick to it. I really enjoy making them & it's all about keeping me motivated.

    OR maybe you'd like to come to a HAC workshop to make it with me? If I get enough interest I'll go ahead.

    Date: Saturday 6th February 1-5pm
    Venue: Balwyn TBC
    Cost: $55 includes all materials & refreshments
    Email: to register your interest kootoyooATgmailDOTcom with HAC 6th February in the subject line.

  • How to make a reversible placemat cover...
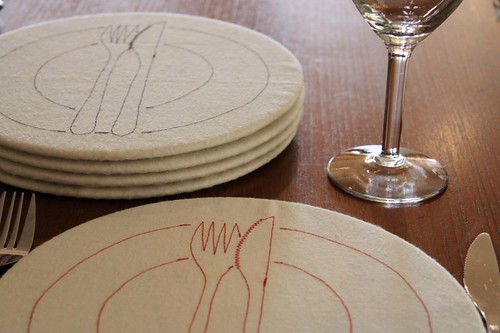
    How to make a reversible placemat cover...
    Reversible Tablesetting Placemat Cosy

    Hello! It's a public holiday in Melbourne.

    Today I ran in the rain, had a terrible coffee, sewed a bit, shopped with the kids, cooked a bit & generally took things pretty easy.

    There have been a few questions about the placemat covers so I've put together a HAC "how to".

    Gather your supplies...
    Fabric
    Fold Over Elastic
    Pins
    Sewing machine
    Circular placemat

    If you're planning on doing any embroidery (either traditional or machine), or maybe some other decorative application like gocco or applique - do that before you cut your circles.

    Pmats001

    Cut two circles approximately 1.5 inches larger than your placemat.

    Pmats002

    Pin with wrong sides together.

    Pmats003

    Set your machine to zig zag & stitch the fold over elastic to the outside of the circle shape. You need to stretch the elastic fully. Go slow & remember to keep your needle in your work as you stretch. If you're stumped now's the time to visit Amy Karol's FOE tute...it's a ripper.

    Pmats004

    Once you're finished the cover should look something like this.

    Pmats005

    Slip the cover onto your circular placemat & enjoy. Look Liesl it's a shower cap!

    Reversible Barkcloth Placemat Cosy

    Time yourself...super speedy gift idea.

  • How to make a corner bookmark...

    How to make a corner bookmark...
    bookmark

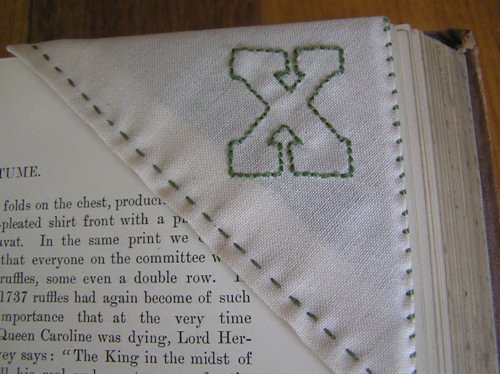
    x marks the spot
    Magnetic Corner Bookmark
    a tutorial

    Gather your supplies:
    Embroidery floss, scrap cardboard (a used cereal box is ideal), calico, scissors, craft knife, needle, fade out marker, adhesive backed magnetic tape.

    Step 1:
    Take a deep breath…there’s a bit of maths here.
    Prepare your templates.
    Cut a 13cm (5.1 inches) square from scrap cardboard
    Cut a right angle triangle measuring: 7.5cm (2.95 inches) x 7.5cm (2.95 inches) with a hypotenuse of 10.5cm (4.13 inches).

    Step 2:
    Cut your magnetic tape to fit & stick it to the triangles so that they come together neatly. Set aside for later.

    Step 3:
    Using your square template as a guide cut out your calico. Leave a seam allowance outside the template of approximately 1.5 cm (3/4 inch).

    Step 4:
    Press your calico square around your cardboard template.

    013

    Begin by pressing the corners as pictured above.

    014

    Next press each of the sides as pictured. This removes a lot of the bulk in the corners & will keep the folds nice & neat.

    Step 5:
    Remove the cardboard template & fold the square in half to form a triangle.

    017

    Press. Fold in half again & press.

    Step 6:

    xtemplate

    Print this template or just trace/draw your own "x".

    018

    Unfold your pressed triangle & positioned it right side up. Whip out your fade out marker, check your folds carefully & mark your “x” where you would like it positioned on the face of the book mark. You need to make sure that you mark your “x” in the left hand (or 9 o’clock) triangle of your square. Just bear in mind that the centre seam will run parallel to the spine of the book.

    Step 7:
    Stitch your “x”. Gift…use a speedy stitch like running or back stitch.

    Step 8:

    020

    Once you’ve finished stitching your design place your work face down on the ironing board & repress the folds.

    Step 9:

    022

    Position your triangle shapes (magnet side down) inside the seams & fold in half.

    Step 10:

    023

    Pin to secure.

    Step 11:

    024

    Running stitch along each of the short sides of your triangle.

    Step 12:

    027

    Once you’ve completed the running stitch – make the final fold & remove your pin. Now blanket stitch the short side closed to form your “cuff”.

    You’re finished & ready to gift.

    ...

    Would you like the premium how to? There are lots more images, printable templates & some extra tips too. All for less that the price of a coffee & delivered to your inbox. CDs & kits also available - over here.